Sunday, October 25, 2015

Photographic Art

The best laid plans of mice and men..... I was hoping to be a bit further along with my art on a commercial level by now but it seems that I will have to be content with much slower progress. In an effort to progress more quickly I pushed my body (health wise) just a little too hard and set myself back a bit. The pressure is off for a couple of months as far as my photography club competitions go having submitted our final EOY Prints and PDI last night.

I am really enjoying my art at present and there seems to be a growing appreciation of it by my peers and the public in general. I have been asked by quite a number of people how I create the dust in my Rodeo images. Some are flatteringly referring to my style as 'Western Fine Art'. I do think that I have my own unique style emerging but I'm not sure that I want to be labelled anything just yet.

One of the sections or  genre catered to by our club is called Altered Reality / Creative ("ARC") and happens to be my favourite section. Most camera clubs do not have a specific section to cater to this genre and due of a lack of support in the Print category our club has announced that it will be discontinued in the new year but entries will still be accepted in the PDI (Projected Digital Imagery) Open section. The news was quite devastating to those of us that do support this genre and when we expressed this to the club they offered one of the more experienced ARC photographers and myself the opportunity to provide a presentation (each) to the members (our styles are very different so too were our presentations).

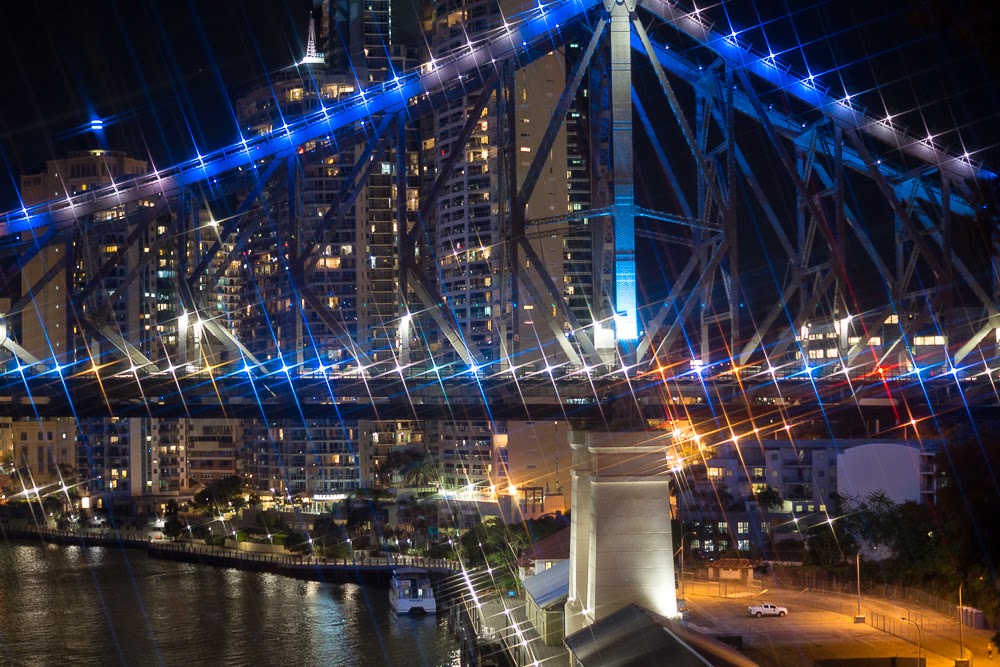
For my part I put together two presentation images which were to become working examples, one basic; Huge moon behind skyline and the other a more advanced; dust and grit layers with provision for members to insert their own element. I wanted to give everyone the opportunity to get a real hands on feeling for what we do and perhaps they too would like to try a little ARC. I provided a step by step construction handout for the first image and I was pleasantly surprised at the number of questions relating to the various processes.

In a future blog I'll give a detailed account of the presentation and access to the images so that readers can share the experience. - I need to do a little research on how best to do this. In the meantime I'll leave you with the two images.


That is finished but without the main element and the following is with my "Spirited" element.


So until next time... which hopefully will be in the near future - take care.

Pete

Tuesday, July 28, 2015

Exposure Award

I have not blogged for a very long time, primarily due to health issues which I'll not boor you with here suffice to say that writing and blogging is very therapeutic and I'm encouraged to do more of it.

Anyway this is going to be very short as I'll include a copy of an official letter of recognition received this evening.  I feel that this letter of recognition is as much yours as it is mine. I will take this opportunity to say thank you to family, friends and followers who appreciate my art and especially to those who took the time and trouble to vote for a couple of photographic entries which I submitted to the Fifth Annual Exposure Awards - "Blue" and "Purple Chaps".

The image "Purple Chaps" was successfully accepted into the Documentary Collection as part of the Fifth Annual Exposure Award and displayed at the most esteemed museum in the world, the Louvre in France. The photograph is being prepared for print in the Documentary Collection Book. There are 111 pages of photographs representing 191 countries, seen and appreciated by over 5 million enthusiasts. The image is on page 73, I cannot even begin to tell you how blessed and honoured I feel.


Till next time, take care and God bless.

Pete.

Thursday, January 22, 2015

Motion Graphics - Intro

Our brand development for P V Media Productions is coming along quite nicely. I have completed the 30 second intro clip which will precede any media we release. 

Before I go any further, I thought it would be appropriate to acknowledge and thank Michael Park of Creative Cow for the tutorial Creating a realistic earth using only Ae and the project files. Also thanks to Andrew Kramer of iStars for his tutorials which gave me inspiration as well as technical knowledge.

I had a vague idea of a concept which included a camera lens, the earth reflected in the lens 'Captured' is the term used by photographers and film makers. I have always been keen on special effects as can be seen on my earliest films (by those who are closest to me - charcoal outlines developing into colourful images and picture within picture, a difficult process with standard 8 film back in 1980). Today in 2015, Motion Graphics is the new trend to expand special effects into 3D affordably for the smaller film-maker and such a lot of fun.

I started off by simply following Michael Park's tutorial and using the project files he supplied and once I was able to replicate the effect I started experimenting to take the process a few steps further along. I would save the project with a version number so that I could go back a step to a clean slate if I became too entangled in the process and elements.

The first advancement for me was to have the cloud actually rotate around the earth a little faster than the rotation of the earth. I achieved this by using key-frames to offset the centre of the cloud mask. Then I thought it would be more interesting if we saw that cloud forming and dissipating while it rotated. To do this I duplicated the cloud layer, inverted the selection, changed the midpoint offset to oppose the original and set the radius a fraction larger than the original. Then I used key-frames to adjust the opacity of each cloud layer at irregular intervals.

Next was to add the moon to the clip and I wanted it to rotate as well, first a little research to get size, timings and rotation speed relative to the earth. I searched NASA's site for royalty free map of the moon which I found and so I created a pre-comp along the lines of the earth tutorial and set the rotation to 2 using an Adjustment layer for angle control. I used a path on the Final_Comp to have the Moon rotate around the earth at about 13 degrees over the 30 seconds. I pick-whipped the radius of my 'Moon' to my 'Master_Earth' so that any adjustments made to the size of my earth would be reflected in the moon - proportionally.

I then added a new composite background layer which was created from an image of the Andromeda Galaxy captured by Hubble and my own photograph of the Milky Way Galaxy, merged in photoshop. I placed this above my own version of the original 'Starfield' which I created using fractal noise (there are heaps of youtube tuts online to do this). I set the mode for this Composite_Space layer to 'Screen' so that I could do the same technique as my clouds layers and offset the centre which would give the illusion of moving star-fields (but very subtle).

Wanting to give the viewer the illusion of moving away from the earth to take up an orbiting position, I increased the starting size of my 'Master_Earth's radius until the moon was just hidden from view and used key-frames to control the reverse zoom effect. The end result was to give the illusion of the moon appearing from behind the earth as the viewer moved away into the universe slightly to the right whilst ascending. I then sought a piece of music that I wanted to associate with our brand whilst creating a mood of suspenseful anticipation. I purchased the piece from Pond5 and aligned the music and graphics to my liking.

Lastly I added our logo, the lens with P V Media across the face and our marketing blurb. I played around with different effects to make the appearance of each element separate and interesting and to take no more than 16 seconds. It is paramount to have the clip end before the viewers interest. This then is our intro clip which will transition into all future projects. 

Comments and feedback are most welcome.


Till next time, God Bless.

Saturday, January 10, 2015

Brand development

Now that the Christmas holiday craziness is over for another year I can get back on track, I hope - What's that old saying, the best laid plans of mice and men.....

Okay so this is the plan, I want to create a video clip for a 30 second brand intro, more or less. Surprise, surprise, I've used the face of a lens as the background image for our 'P V Media Productions' brand. The scene starts with an orbiting earth which will morph into the lens face as the brand information begins to appear from a comet which morphs into the text as film strips. All of this unfolding in 3D giving the viewer the sense that they are witnessing the birth of a unique phenomenon. I've always wanted to do a little motion graphics the only fly in the ointment is that I have to learn how to use Ae (Adobe After Effects), so this could take a while but it will be done.

First step is to get all the text just the way I want it so I used Ai to create a film strip and I didn't want black or blue as the colour, too traditional so I opted for hot pink gradating to black. Next I needed to create a path to affix theses film-strips to, so I used 'Edwardian Script ITC' font for the wording 'P V Media'. BTW 'P V' are simply mine and my wife (Bonnie Ronnie is my nickname for her) Veronica's initials.

Once I had modified the path to present the film strips just the way I wanted them, I set about attaching them to the path and positioning them just right so that they flowed with the curves of the font, I then hid all layers except the group of 16 film strips.

I needed a background graphic, something simple that could be stylised in the future and it needed to be a strong association image. A camera is a little too complex and would date quickly, also the type of camera could limit association, as would a clapper-board. I thought yes a lens is a lot more associative depending on perspective so front on it would be! I photographed one of my lenses and modified it in photoshop altering the description from the original to LENS 10-1000mm 1:16-22 which is really quite meaningless but gives the illusion of a powerful lens for a powerful camera of whatever type.

The rest of the 'Brand' compilation was relatively easy, a little messing around with placement for sign production, business cards, stationary etc. Lastly I wanted to put this all on a colour background but not a standard flat colour - too boring! Gradated colours are nice, especially pastel shades so I started mucking about with a simple two colour gradation on a single layer in photoshop until I saw something I liked - simple is always best. This is the end result for all printed branding, the red border is simply my crop line.
Next step is to learn how to make a rotating earth with all the elements in Ae, stay tuned for more.

Till next time, God Bless.

Friday, October 17, 2014

More Bramping

I thought I would put triggertrap onto my Samsung 'Galaxy' tablet as it has far more life in it than my phone which has a faulty battery. I had to do a double-take as the app looks completely different and has different features. After checking that everything connected okay and was in working order I set off to capture the October Blood Moon from Mt Coot-tha. The photographers ephemeris indicated that the moon would rise above Brisbane botanical gardens and traverse the city so I was pretty excited. I wanted to be sure to get a good position and I knew that there would be photographers and astronomers by the score for such an event so I left early.

Sadly while in transit to claim my spot the weather closed in unexpectedly and although hopeful that the thick cloud cover would dissipate in time for the eclipse, it was not to be. However, I was not going to let that stop me from taking some photos and attempting another bramping. Cloud cover was very thick and verging on fog with the city in the distance difficult to see at times, so it would be good practice for me. About 150 shots gave me the following (same settings as the following clip - just cut short)

Trying to anticipate the lighting transition is for me the most difficult thing but I know that one must experiment and try different things in order to find the optimum settings. Using the Sony a99 with the G2 SSM 70-400 lens in Manual mode at ISO 100, 160mm, f/11, Bulb. Triggertrap was set at 365 images over 60 minutes with the first exposure at 1/15sec and the last exposure at 8sec. This is a photo every 10 seconds.


In my last blog I mentioned setting the drive mode to multi, I'll explain why. I have found setting my drive mode to multiple exposures allows the camera to process overlap, whereas single exposures as a rule of thumb require as much time to process as the exposure duration. I.e. a 10 second exposure requires 10 seconds of processing time and the shutter will not fire until this process is complete. This means bramping up to 8 seconds would require a minimum of 16 seconds as the interval add a couple more to be on the safe side and you are looking at 18 seconds. This interval would effectively halve the number of exposures and of course it would (in my opinion) be less than satisfactory time-lapse.

Earlier this week I decided to head into the city and try a few other settings so I went up to Wilson's Lookout for this bramping. Again I used the Sony a99 but changed the lens to the DT 18-250mm. I wanted to try a smaller ISO and aperture so setup ISO 50, 20mm, f/22, Bulb and set Triggertrap on my phone (Samsung Galaxy III) at 360 shots over 1 hour starting at 1/15sec (the fastest shutter speed by triggertrap bramping) and ending at 8.0sec. Not good, it took a lot of work in post to get anything anywhere near usable. BTW I always shoot in RAW when trying something a little different, just in case I need to recover data in post (Post processing I use Lightroom 5.4 and Gunther Wegner's LRTimelapse 3.4) I'm still learning both of these applications but having a ball.


While I was in the city I thought I would try and capture a short time lapse of the Story Bridge with it's traffic from one end and because I'm not as fit as I used to be, it was going to be the closest end. Now I wanted to capture increasing light trails as the time lapse went on, I had done this on the M1 and the result was fantastic but I had been bramping and I thought why not try that here so I located a sweet spot where I could get the bridge in frame and I was almost central as I looked down the length of the bridge. I used the same equipment and light limiting settings as the previous time-lapse however instead of setting the camera to bulb I set the camera's shutter speed to 1/10sec. This of course overrides the Triggertrap shutter settings. I used my Tablet as the phone was almost out of battery. In the process of getting setup I took a few images, one of which I'll share now.


The biggest issue is the fastest shutter speed allowed by Triggertrap's bramping app is only 1/15sec and there is no facility to alter the ISO settings which would really be something. Imagine ISO 100 and 1/250 sec or ISO 800 and 1/10sec either would freeze the traffic's lights and then we could increase gradually to say 8sec to give us the longer light trails ... but for now this is the result.


I went back to Wilson's Outlook last night to see if I could improve on on the previous Time-lapse and I am very pleased with the result. I used the Sony a99 with the DT 18-250mm lens. I wanted to try a larger ISO and aperture so setup ISO 100, 20mm, f/22, Bulb and set Triggertrap on the Samsung Galaxy Tab at 360 shots over 1 hour starting at 1/15sec and ending at 7.0sec.


Before I packed up to head home I thought I would have a little fun with the DT 1.8/50 Lens and a Star filter.


What do you think? Please leave comment's.

Till next time, take care and stay safe.

Friday, September 12, 2014

Bramping

I am particularly keen to learn a little about timelapse photography and have been studying this for about a month. Of course the best way to learn is hands on so I'm practising this at every opportunity.

"Bramping" - An interesting word, when I first heard it I thought "I like the sound of that, how appropriate." Of course it helps to know in what context the word is used and what it means. It is a term coined by the makers of 'Triggertrap', an 'app' (software application) for the control of a digital camera's shutter via ones mobile phone (Cell phone). 

My friend Gerry knows of my interest in photography and videography so brought the app, 'Triggertrap' to my attention recently. The app itself was free on purchase of the 'Triggertrap dongle' and connection cable specific to each make of camera. The cost was a little higher than expected but well worth the investment in any event.

Bramping is simply an acronym for Bulb Ramping which is a technique for capturing diminishing (or increasing) light, particularly during the magic hour(s) at dusk and dawn. The magic hour(s) are often referred to as the 'Holy Grail' by photographers because as light fades (or increases) so the shutter would need to be kept open for longer (or shorter) periods. Of course the shutter is not the only setting one needs to be concerned with but it is the easiest to control without tethering a tablet or laptop to the camera (something I have yet to learn but that's not too far off). 

Of course this Bulb Ramping can be done manually but the slightest movement to the camera would have disastrous results. With rule of thumb '10 sph' (10 seconds of time lapse video per hour of shooting) it is best to have a remote trigger and there are many that include an 'intervalometer' (a remote trigger on a meter that can be set at various intervals) I don't believe that any of these intervalometers have the ability to control exposure ramping (varying the length of time that the shutter is open) but I could be wrong.

I have been using a little device called 'Nero' which is a remote triggering device and it works like a charm (see my previous blogs for more info on the Nero) however, while it does control exposure it does not provide bulb ramping. This is where I am hoping that Triggertrap's Bramping will come into play and I have been experimenting with a variety of lighting, as you will see in the following two examples.

The first 'Bramping' is the Petrie Railway Station using the Sony a99 ISO 100, 18mm, f/22, Bulb on a sturdy tripod. The Triggertrap settings were - Bramping; Exposures=360, Interval=10sec, Start=1sec, End=8sec. This then gave me a duration of 1 hour of shooting. Please also note that Drive Mode must be set to 'Multi' and focus must be set to 'manual'. I used f/22 for depth of field, a low ISO for less noise and I knew that there would be plenty of artificial light so it was a good starting point.

I've included Youtube links below the images.


The second 'Bramping' is Moonrise over Shornecliffe Pier. This was far more challenging because I was not setting up for the magic hour in a well lit area but would actually be photographing the light source as it got brighter. For this I used the Sony a65 with the 70-400SSM lens, ISO 200, 330mm, f/13, Bulb on a sturdy tripod with a Gimbal head. Triggertap settings were - Exposures=360, Interval=2sec, Start=1sec, End=1/9sec. This gave me a duration of 12min shooting.  Obviously I see room for improvement but I'm quite pleased with the result for my first attempt at a moonrise with this device.


In hindsight I should have allowed a lot more light in at the beginning and a little more at the end as well but one lives and learns. Please feel free to comment, post questions or offer advise as all will be most welcome. Till next time, take care out there and stay safe.

Tuesday, September 2, 2014

Brisbane winter storms time lapse

Well as you are probably aware, I am having an absolute ball with this time lapse photography. The more I get into it of course the more gear I want, I was going to say "need" but that would be untrue.

I have been using the 'Nero trigger' which I bought a few years ago for about $300.00 if memory serves. I must say that I am very impressed with the time lapse feature, not having used the other features yet I cannot give an opinion on them, however a great bit of kit for any photog. It weighs only a few grams and is not much bigger than an LCD screen. 

Before I go on I had better clarify something right off the bat... I am not sponsored by anyone for anything and the opinions I give are my own from my experience as a result of my choices just as any choice you make is your choice and we are each responsible for our own research and consequences.

Anyway back into it.... the last couple of blogs were about some of my silly mistakes and I shared the result of those so that you could see how much time could be lost. You need to be very mindful of the number of shots you are going to need because time lapse photography is a very time consuming exercise. I'm going to share my rule of thumb - 10seconds per hour. Shooting at 1 image per 10 second interval will give you 6 images a minute or 360 images an hour. Now if you are in Australia you would be using the PAL system where the best compression is H.264 to produce MP4 quality video and unless you are shooting strictly for TV you would most likely want to use the standard HD 1080p 25fps which equates to 14 seconds of video footage. To put this in perspective, the average working week is 38 hours (I think) but it would take me 42.85 hours to produce 10 minutes of video and that does not include post processing.

As you can see little errors can become costly blunders in the blink of an eye but it's all good as I'm making those mistakes for both of us and as long as you follow my blog I will steer you clear of the gopher holes I step in. When you get it right and you finish putting together even a few minutes of video footage, with sound effects and music score, the sense of self satisfaction is absolutely huge. For me the most important thing is satisfying my biggest critic and my biggest client - Me! If others like my stuff, even better but the bottom line is, if I'm not satisfied - no one else will ever see it.

Last week I said that I would post some 'good' work (I would be grateful for your opinion), but I'll only include a link here as the quality of the video's within these blogs, leave a lot to be desired as do you tube and other online services, only because the internet needs huge bandwidth for quality, a costly commodity.


I'm quite pleased with the end result, of course there were a number of issues during the shooting that I'll be improving on but at this point in time ... what do you think?

Now I've have just started to photograph the magic hour (that hour after sunset) when ramping is required for the transition from day to night. For this I'm using a little app on my Galaxy S III called 'Triggertrap' which has a "Bramping" (Bulb Ramping) feature. I've only used it once so far and for light trails but Oh-la-la the result is beautiful :) More of that next time.

Till next time, take care and stay safe.

PS. Please do comment below, the feedback (good or bad) is ever so encouraging.